
AWS EC2 userdata on Windows
AWS EC2 user data
As I have been previously doing more work on the other cloud, namely Amazon Web Services (AWS), I have found a few things that are worth mentioning and in this article here I will start with EC2 instances and their deployment / provisioning on AWS.
Often you will find yourself in the situation where you will need to run code post deployment of your AWS marketplace or pre-baked custom Amazon machine image (AMI) that you weren’t able to run while creating the AMI or wasn’t included into the marketplace AMI. Examples for this could be:
- joining a Microsoft Active Directory Domain
- installing (or registering) agents, like Anti Virus or monitoring agents
- preparing the instance for other Configuration Management tools like Ansible, Puppet or Chef
Depending on what sort of image (AMI) you are deploying you actually have two options:
- you own the image:
- create a Scheduled Task while baking the image
- user_data
- you don’t own the image:
- bake a new image from the marketplace image
- user_data
AWS userdata
AWS gives you, as the provisioner of instances, the capability of injecting code into the launch process of an EC2 instance, no matter if you go straight to EC2 or use for example CloudFormation to deploy your infrastructure.
UserData is code that is executed on instances upon instance launch. On Windows that code can come in two flavours, script and powershell.
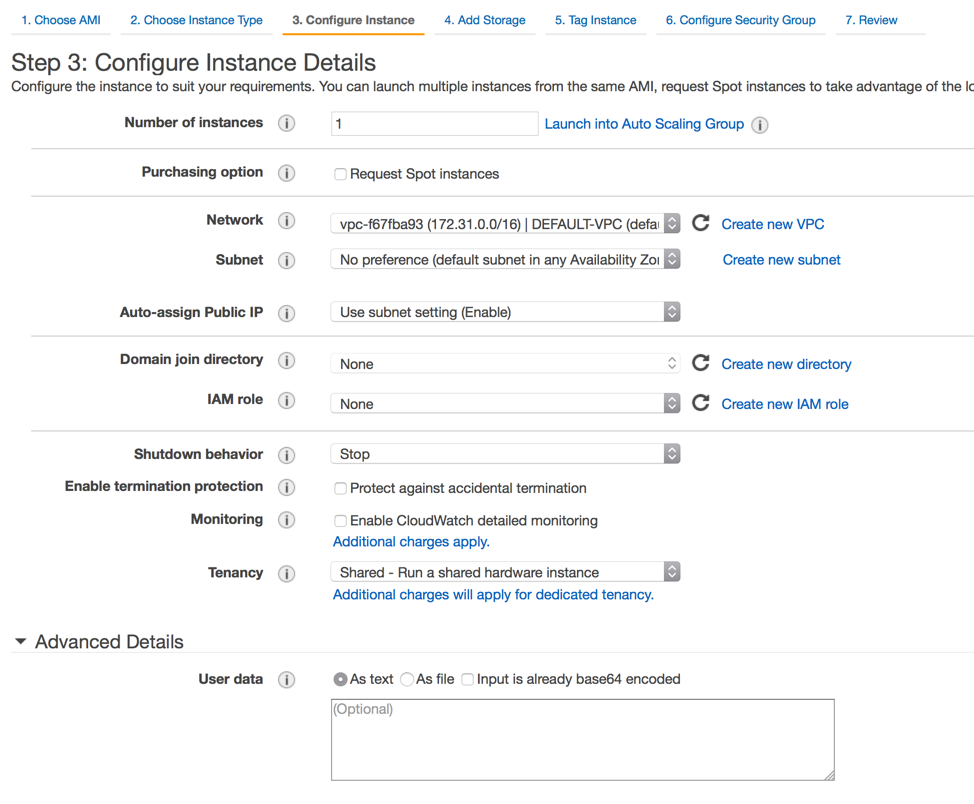
Your userdata code is configured / set before you launch your instances and if you are using the AWS Console to launch them then above picture will show you where to input the code. UserData is a block of code with a maximum size of 16kb, after it has been encoded to Base64. This means don’t put a 1000 lines of PowerShell code in here.
A very basic test showed me that around 200 lines of PowerShell encoded into Base64 equal around 16kb.
For example setting your machines up for Ansible with this PowerShell script would still work via userdata: https://github.com/ansible/ansible/blob/devel/examples/scripts/ConfigureRemotingForAnsible.ps1
However, you don’t normally use the AWS Console to spin up machines, right? Just as you wouldn’t use the Azure portal to deploy instances, you would use a CLI, a tool like Ansible or in AWS’s case CloudFormation to help you with this task.
UserData on Windows can call two different shells, well, the two that exist on Windows (except for Bash, for now?).
script will convert your code into a .bat file and call cmd.exe. powershell will convert your conde into a .ps1 file and call powershell.exe.
userdata on Windows from CloudFormation
CloudFormation uses json format to describe your environment / infrastructure. If you are familiar with Microsoft Azure then this will be similar to an Azure Resource Manager (ARM) template. Part of this CloudFormation template would be the UserData block as you can see below.
"UserData": {
  "Fn::Base64": {
    "Fn::Join": [
      "",
      [
        "<script>\n",
        "powershell.exe -Command \"",
        "set-itemproperty ",
        "\\\"hkcu:Software\\\\Microsoft\\\\Windows\\\\CurrentVersion\\\\Internet Settings\\\"",
        " -name ProxyEnable",
        " -value 1",
        ";",
        "\n",
        "\n",
        "powershell.exe -Command \"",
        "set-itemproperty ",
        "\\\"hkcu:Software\\\\Microsoft\\\\Windows\\\\CurrentVersion\\\\Internet Settings\\\"",
        " -name ProxyServer",
        " -value \\\"",
        "http=",
        {
          "Ref": "ProxyServerEndpoint"
        },
        ":",
        {
          "Ref": "ProxyPort"
        },
        ";",
        "https=",
        {
          "Ref": "ProxyServerEndpoint"
        },
        ":",
        {
          "Ref": "ProxyPort"
        },
        ";",
        "ftp=",
        {
          "Ref": "ProxyServerEndpoint"
        },
        ":",
        {
          "Ref": "ProxyPort"
        },
        ";",
        "socks=",
        {
          "Ref": "ProxyServerEndpoint"
        },
        ":",
        {
          "Ref": "ProxyPort"
        },
        ";",
        "\\\"",
        ";",
        "\n",
        "\n",
        "powershell.exe -Command \"",
        "set-itemproperty ",
        "\\\"hkcu:Software\\\\Microsoft\\\\Windows\\\\CurrentVersion\\\\Internet Settings\\\"",
        " -name ProxyOverride",
        " -value '",
        {
          "Ref": "ProxyExcludeList"
        },
        "<local>",
        "'\"",
        ";",
        "\n",
        "\n",
        "netsh winhttp import proxy source=ie;",
        "\n",
        "\n",
        "cfn-init.exe -v",
        " --http-proxy=\"http://",
        {
          "Ref": "ProxyServerEndpoint"
        },
        ":",
        {
          "Ref": "ProxyPort"
        },
        "\"",
        " --https-proxy=\"http://",
        {
          "Ref": "ProxyServerEndpoint"
        },
        ":",
        {
          "Ref": "ProxyPort"
        },
        "\"",
        " -c config -s ",
        {
          "Ref": "AWS::StackId"
        },
        " -r DomainController",
        " --region ",
        {
          "Ref": "AWS::Region"
        },
        "\n",
        "</script>\n"
      ]
    ]
  }
},
This example json is used to configure the local proxy on an instance leveraging the script call. This is done because here we are calling both PowerShell cmdlets and “legacy” executables like netsh. When both script and powershell are used in a userdata block then the batch script always gets executed first, no matter in what order the blocks are put in the userdata field. My recommendation is to only use script or powershell, not both. The Ref calls are used to gather input parameters to the CloudFormation script.
userdata with aws cli
If you are going straight to the aws cli to provision your instances then using the userdata script is just as easy.
aws ec2 run-instances --image-id ami-fbc42a3 --count 1 --instance-type c4.large --user-data file://user_data.txt --subnet-id subnet-fbc42a3 --security-group-ids sg-fbc42a3 --key-name david-dev
user_data.txt would consist of the cleartext code that you want run upon instance launch encapsulated in the <powershell>$code</powershell> syntax.
userdata with AWS PowerShell module
Are you running your provisioning scripts on Windows and do you have access to the AWS PowerShell module? If yes, then New-EC2Instance has two parameters that will help you pass in your userdata into a new instance.
New-EC2Instance -ImageId ami-fbc42a3 -MinCount 1 -MaxCount 1 -InstanceType c4.large -KeyName david-dev -SecurityGroup sg-dev -userdatafile user_data.txt
or
$userdata = '<powershell>get-service</powershell>'
$EncodeUserData = [System.Text.Encoding]::UTF8.GetBytes($userdata)
$encuserData = [System.Convert]::ToBase64String($EncodeUserData)
New-EC2Instance -ImageId ami-fbc42a3 -MinCount 1 -MaxCount 1 -InstanceType c4.large -KeyName david-dev -SecurityGroup sg-dev -userdata $encuserData
If you didn’t know, the AWS PowerShell module is available on most AMIs out of the box. If not, and you are on WMF5 or have PackageManagement installed on your machine, then run the following command to install it from the command line:
Install-Module AWSPowerShell
Execution context
Depending on what you need to do you need to be aware of the execution context of your userdata script. If you are launching an AMI for the first time that has the “auto-generate Administrator password” flag set in the EC2Config then the script will execute in the context of the localhost\\Administrator accoun. If this is not the case then the context of the EC2Config service will be used, by default that is the SYSTEM account.
Troubleshooting
The resulting script will be copied to the instance to the following path: C:\\Program Files\\Amazon\\Ec2ConfigService\\Scripts\\UserScript.ps1. Here you will be able to see the resulting script and check if your parameters were passed into your userdata script correctly for example.
Start playing around with this, I will post some more info on this in the future.
Leave a Comment