
AWS EC2 proxy settings on Windows
Configuring EC2Config service proxy settings on Windows
You will often find yourself in situations on Amazon AWS EC2 instances where you need to access another AWS service. In a lot of those situations your instance won’t have any internet connectivity from its subnet, which in itself is not an issue, until you need to get your Windows instance to forward logs to Cloudwatch (AWS’s log collection service). EC2 Cloudwatch is currently not reachable via internal AWS means, like S3 (Simple Storage Service), but it has to go via the internet to reach the Cloudwatch endpoint. As mentioned this might be an issue if your instance doesn’t have and shouldn’t have internet access. If your requirement is to be completely offline (not internet connected) then you’re out of luck, sorry. You can however configure only the EC2Config service to use a proxy to reach Cloudwatch and forward Windows and custom app logs and system metrics.
EC2Config service
The EC2Config service is a Windows service that is bootstrapped into Amazon Machine Images (AMIs) and runs in the system context. This service comes with its own UI to execute certain tasks on a Windows instance like running sysprep and preparing the machine to become an AMI and also and more importantly now for us to enable monitoring on our instance.
PowerShell to configure EC2Config service
In my last article about userdata on EC2 instances I described how you can run PowerShell code during instance launch and that functionality is what I am going to use to configure the EC2Config service.
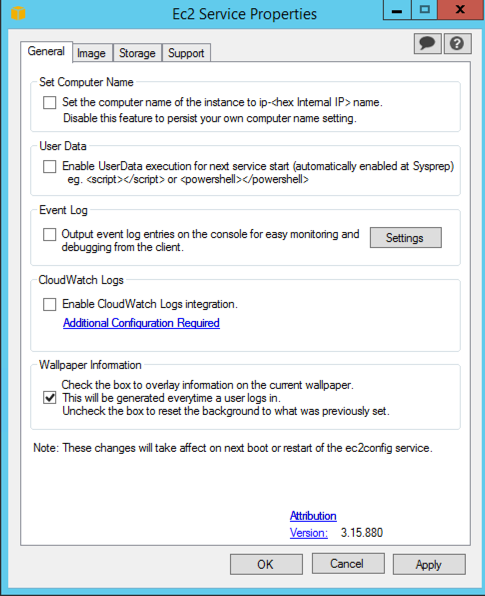
Add the following snippet of PowerShell into your userdata script or for verification just run it “manually” on your EC2 instance and see how it enables monitoring for the instance.
Before executing the code the AWS Console will look something like this.

# Enable CloudWatch in EC2Config
$EC2SettingsFile="C:\Program Files\Amazon\Ec2ConfigService\Settings\Config.xml"
$xml = [xml](get-content $EC2SettingsFile)
$xmlElement = $xml.get_DocumentElement()
$xmlElementToModify = $xmlElement.Plugins

foreach ($element in $xmlElementToModify.Plugin)
{
    if ($element.name -eq "AWS.EC2.Windows.CloudWatch.PlugIn")
    {
        $element.State="Enabled"
    }
}
$xml.Save($EC2SettingsFile)
This snippet enables the actual Cloudwatch Plugin on the EC2 instance and the machine will instantly start trying to upload metrics and logs to Cloudwatch. If your instance is behind a proxy then this will fail if the proxy is not setup for the Windows OS, and it is not as I explained above. The EC2Config service is configured by a EC2Config.exe.config file and in that file we need to add the proxy information for our AWS environment.
#jinja2: newline_sequence:'\r\n'
<?xml version="1.0"?>

<configuration>
  <configSections>
    <sectionGroup name="common">
      <section name="logging" type="Common.Logging.ConfigurationSectionHandler, Common.Logging" />
    </sectionGroup>
  </configSections>
  <appSettings>

    <!--
    <add key="AWSAccessKey" value="" />
    <add key="AWSSecretKey" value="" />
    -->

    <add key="ClientSettingsProvider.ServiceUri" value="" />
    <add key="DesiredStateDocumentUpdateEnabled" value="true" />
    <add key="SsmPollFrequencyMinutes" value="5" />
    <add key="MessageDispatcherEnabled" value="true" />
    <add key="GetMessagesVisibilityTimeoutInSeconds" value="600" />
    <add key="ManifestLocation" value="https://s3.amazonaws.com/aws-ssm-{Region}/manifest.json" />
    <add key="UpdateInstanceInfoEnabled" value="true" />
    <add key="OfflineModeEnabled" value="false" />
    <add key="ErrorThreshold" value="40"/>
    <add key="DirectoryServiceUrl" value="" />
    <add key="FindPluginsInSeparateAppDomain" value="true" />
    <add key="IpcAuthorizedGroup" value="Administrators" />
    <add key="MaxFailCountPerDocument" value="15" />
    <add key="MaxRebootsPerDocument" value="15" />
    <!--Allow time in seconds for normal plugin execution to finish. Value = 8 hours-->
    <add key="NormalPluginExecutionTimeoutInSeconds" value="28800" />
    <!--Allow time in seconds for plugin execution soft stop. Value = 2 hours-->
    <add key="SoftStopPluginExecutionTimeoutInSeconds" value="7200" />
    <!--Allow time in seconds for plugin execution hard stop. Value = 20 seconds-->
    <add key="HardStopPluginExecutionTimeoutInSeconds" value="20" />
    <add key="PluginsDir" value="Plugins" />
    <add key="QuartzThreadPoolSize" value="5" />
    <add key="SleepBetweenDocumentRunsInSeconds" value="30" />
    <add key="TimeOutInSecondsBeforeReboot" value="30" />
    <add key="SerialPortLoggingEnabled" value="true" />
    <add key="ReApplyOnServiceRestart" value="false" />
    <!--ExecutionMode can serial or parallel, default is serial-->
    <add key="PluginSerialExecutionMode" value="true"/>
    <add key="DocumentExecutionSerialMode" value="false"/>
    <add key="DocumentExecutionBatchSize" value="5"/>
    <add key="FirstBootConfigurationWaitTimeInSeconds" value="120"/>
    <add key="UseRegisterComputerApi" value="false"/>
    <add key="DisablePluginFramework" value="false"/>
    <add key="S3LogUpload" value="true"/>
    <add key="S3LogBucket" value=""/>
    <add key="S3LogKey" value=""/>


  </appSettings>
  <startup>
    <supportedRuntime version="v4.0" sku=".NETFramework,Version=v4.0,Profile=Client" />
    <supportedRuntime version="v2.0.50727" />
  </startup>
  <system.web>
    <membership defaultProvider="ClientAuthenticationMembershipProvider">
      <providers>
        <add name="ClientAuthenticationMembershipProvider"
             type="System.Web.ClientServices.Providers.ClientFormsAuthenticationMembershipProvider, System.Web.Extensions, Version=3.5.0.0, Culture=neutral, PublicKeyToken=31bf3856ad364e35"
             serviceUri="" />
      </providers>
    </membership>
    <roleManager defaultProvider="ClientRoleProvider" enabled="true">
      <providers>
        <add name="ClientRoleProvider"
             type="System.Web.ClientServices.Providers.ClientRoleProvider, System.Web.Extensions, Version=3.5.0.0, Culture=neutral, PublicKeyToken=31bf3856ad364e35"
             serviceUri="" cacheTimeout="86400" />
      </providers>
    </roleManager>
  </system.web>
  <runtime>
    <assemblyBinding xmlns="urn:schemas-microsoft-com:asm.v1">
      <probing privatePath="Plugins;Ssm;Ssm\Packages;Packages" />
      <dependentAssembly>
        <assemblyIdentity name="log4net" publicKeyToken="669e0ddf0bb1aa2a" culture="neutral" />
        <bindingRedirect oldVersion="0.0.0.0-1.2.13.0" newVersion="1.2.13.0" />
      </dependentAssembly>
    </assemblyBinding>
  </runtime>
  <common>
    <logging>
      <logging>
        <factoryAdapter type="Common.Logging.Log4Net.Log4NetLoggerFactoryAdapter, Common.Logging.Log4net1211">
          <arg key="configType" value="FILE-WATCH" />
          <arg key="configFile" value="~/log4net.config" />
        </factoryAdapter>
      </logging>
    </logging>
  </common>
  <system.net>
    <defaultProxy>
      <proxy
        proxyaddress="\{\{ awsproxy \}\}"
        bypassonlocal="true"
      />
      <bypasslist>
        <add address="169.254.169.250"/>
        <add address="169.254.169.251"/>
        <add address="169.254.169.254"/>
      </bypasslist>
    </defaultProxy>
  </system.net>
</configuration>
You might notice that I have specified #jinja2: newline_sequence:'\\r\\n' in the first line, this is because this file is used as a Jinja2 template in an Ansible playbook that provisions these EC2 instances. You can also see that there is a variable used for proxyaddress called \{\{ awsproxy \}\}. This variable is passed in to this file and the resulting file will overwrite the existing file on the Windows machine. Use whatever deployment process you already have to achieve the same outcome (Puppet, Chef or straight PowerShell can all do this easily).
Restart the EC2Config service (Restart-Service -Name Ec2Config) and check the EC2Config service’s log file (C:\\Program Files\\Amazon\\Ec2ConfigService\\Logs\\Ec2ConfigLog.txt). You should now see successful uploads of both metrics and logs on your instance and in your AWS console you should now be able to see the logs arriving.`
Leave a Comment